Windows Backups to ZFS
One of the methods I use for backing up Windows applications is to mirror the files to a ZFS file system using robocopy and then snapshot the file system to preserve its state. I use this primarily for nightly backups and during application maintenance because it typically requires that the service be stopped for the duration of the backup.
There are a number of features about ZFS that makes it great for backups. Among them are snapshots, compression, efficient incremental sending of file systems and block storage, etc. Dedup will make its appearance in build 128 which will add further benefits as well. All of these help to conserve disk space and speed up backup and restore operations.
This assumes a recent, working OpenSolaris system with the CIFS service already configured. The latest version of OpenSolaris at this time is build 127. For documentation on how to setup the CIFS service, see Getting Started With the Solaris CIFS Service.
To start off, create a parent file system for the backups. The purpose of this file system is to allow properties to be set once and then be inherited by the descendant file systems created for the backup sets. Enable both mixed case sensitivity and non-blocking mandatory locks to enhance compatibility between POSIX and Windows file semantics. Set the sharesmb property to share the file system via CIFS and to shorten the names of the shares. The name specified below turns into the backups_ prefix for the descendant file system share names. Without it, the prefix would be the full file system path, in this case, tank_backups_. In addition, allow the backup user access to create snapshots on the descendant file systems so that snapshots can be created by simply creating a directory from the script.
# zfs create -o casesensitivity=mixed -o nbmand=on -o sharesmb=name=backups tank/backups
# zfs allow -d backup@edplese.com snapshot,mount tank/backups
With the initial setup completed, begin creating the backup sets. Create a descendant file system under tank/backups for each backup set and give the backup user write access to it. This is a simple example and it might be worthwhile to give other users read access to it as well or add more advanced ACLs to the file systems.
# zfs create tank/backups/someservice
# chown backup@edplese.com /tank/backups/someservice
# chmod 700 /tank/backups/someservice
Normally, I enable compression for the entire pool and then disable it for file systems that won’t see any benefit from it, such as those holding only multimedia files. If compression isn’t inherited by the backup file systems, it might be beneficial to enable it on them. Those that can spare performance for additional disk space might try gzip compression instead of the default lzjb.
# zfs set compression=on tank/backups
Finally, create a customized Windows batch file and set it to run automatically with the Windows Task Scheduler.
@echo off
set src="D:\Data\SomeService"
set dst="\\opensolaris\backups_someservice"
set service="SomeService"
set timestamp="%DATE:~10,4%%DATE:~4,2%%DATE:~7,2%-%TIME:~0,2%%TIME:~3,2%%TIME:~6,2%"
set timestamp="%timestamp: =0%"

net stop "%service%"
robocopy "%src%" "%dst%" /MIR
net start "%service%"
mkdir "%dst%\.zfs\snapshot\%timestamp%"
The script is straight-forward, and the only complicated lines are the timestamp ones. Between the two of them they build a timestamp of the form YYYYMMDD-HHMMSS. The second line fixes single digits that occur, replacing the leading spaces with zeros.
The last line is interesting in that instead of simply creating a directory, a ZFS snapshot is taken instead.
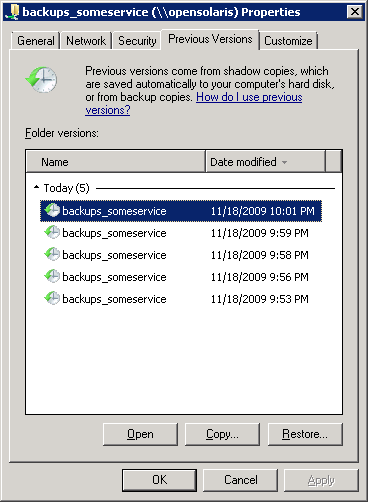
For restoration, navigate to the share on the server, right-click, select Properties, and then click on the Previous Versions tab. From here, you can easily browse through the snapshots. You can also right-click on individual files and then click on Restore previous version and it will only list the versions of the file that differ rather than displaying every snapshot.

There are, or course, a number of ways to improve this backup scheme. Here are a few to test out.
Take a look at some of the other options for robocopy. There are a bunch to go through, but a couple notable ones are:
/B– Enable the backup privilege, allowing it to backup files it doesn’t normally have permission to./COPYALL– Copy NTFS security information including file ownership and the data and audit ACLs.
Instead of stopping the necessary services, create and mount a volume shadow copy of the NTFS volume and mirror from that location.
The flexibility for ZFS is astounding when it comes to backups and it’s amazing what a simple script can accomplish.